
Why integration matters
Integrating Jira with Confluence helps teams bridge the gap between project tracking and documentation. By linking these two powerful Atlassian tools, teams create a unified workspace where information flows freely—connecting planning, execution, and reporting.
The result is streamlined documentation, real-time visibility into progress, and significantly reduced context switching.
Whether you’re preparing for a release, resolving bugs, or conducting a retrospective, in this article I’ll walk you through using Jira and Confluence together to keep everyone aligned and informed.
Key insights on how to connect Jira to Confluence
- Integrating Jira with Confluence connects issue tracking with documentation, enabling a unified workspace. Teams benefit from real-time visibility, streamlined documentation, and reduced context switching.
- Users can embed Jira issues and dynamic filters directly into Confluence pages using JQL and macros, create issues from Confluence via multiple intuitive methods, and visualize issue data with built-in chart macros.
- Jira automation rules and third-party apps like AutoPage allow teams to generate Confluence pages automatically based on issue triggers, ensuring timely and consistent documentation.
- Tools like Viable Issues and AutoPage can enhance structure, consistency, and automation across documentation.
What to do before you start your Jira and Confluence integration
Before you start: on a Cloud site with both Confluence and Jira? You can stop here, there’s nothing to do as it’s automatic. Otherwise, you need to figure out which scenario you’re in, because it will change what you need to do.
Same Cloud site (Jira and Confluence on one .atlassian.net): There’s nothing to set up. Integration is automatic the moment both products are active on the site — page mentions, macros, and gadgets just work.
Do not create an application link manually. A redundant manual link sits alongside the automatic system link and breaks the OAuth handshake between them, which is one of the most common self-inflicted integration problems. If same-site linking isn’t working, the fix is usually to delete a manually created link, not add one.
Everything else :
- two different Cloud sites (e.g. Jira on one .atlassian.net, Confluence on another)
- Cloud-to-Data-Center
- Server/Data Center on both ends
here you do set up an application link manually, and the steps below apply.
Prerequisites for a manual setup
You’ll need system administrator global permission on both products. For any setup that crosses a network boundary (cross-site, or Cloud-to-Data-Center), also confirm the remote instance is reachable: a correct, publicly accessible base URL and the required ports open. For same-site Cloud, none of this applies — skip ahead, because you have nothing to configure. Step-by-step: linking manually
- In the product you’re linking from (e.g. Jira), open the admin area and go to Application Links (in Jira Cloud: Settings → Jira apps → App Links).
- Enter the URL of the instance you’re linking to, then select Create link.
- Follow the prompts in the wizard. You’ll be redirected to the other product to authorize the connection.
- Make sure the reciprocal link back from the other product is created too — this is what completes the two-way connection and enables full integration features like page mentions, macros, and gadgets. If you’re not an admin on both ends, an admin on the remote side will need to confirm the link there.
Displaying Jira issues in Confluence
There are multiple ways to display Jira issues in Confluence.
Embed a single Jira issue (smart link or macro)
You can display a single Jira issue by simply pasting a Jira issue URL (e.g., https://yourjirasite.atlassian.net/browse/PROJECT-123) into a Confluence page. It will auto-convert into a smart link, showing key issue details such as status and assignee.
Alternatively, use the Jira Issue/Filter macro:
- Select “+” → Jira Issue/Filter.
- Search for the issue key (e.g., PROJECT-123) or paste the URL.
- Choose your preferred display format (e.g., inline text, full details, or a card view).
- Customize columns and fields shown.
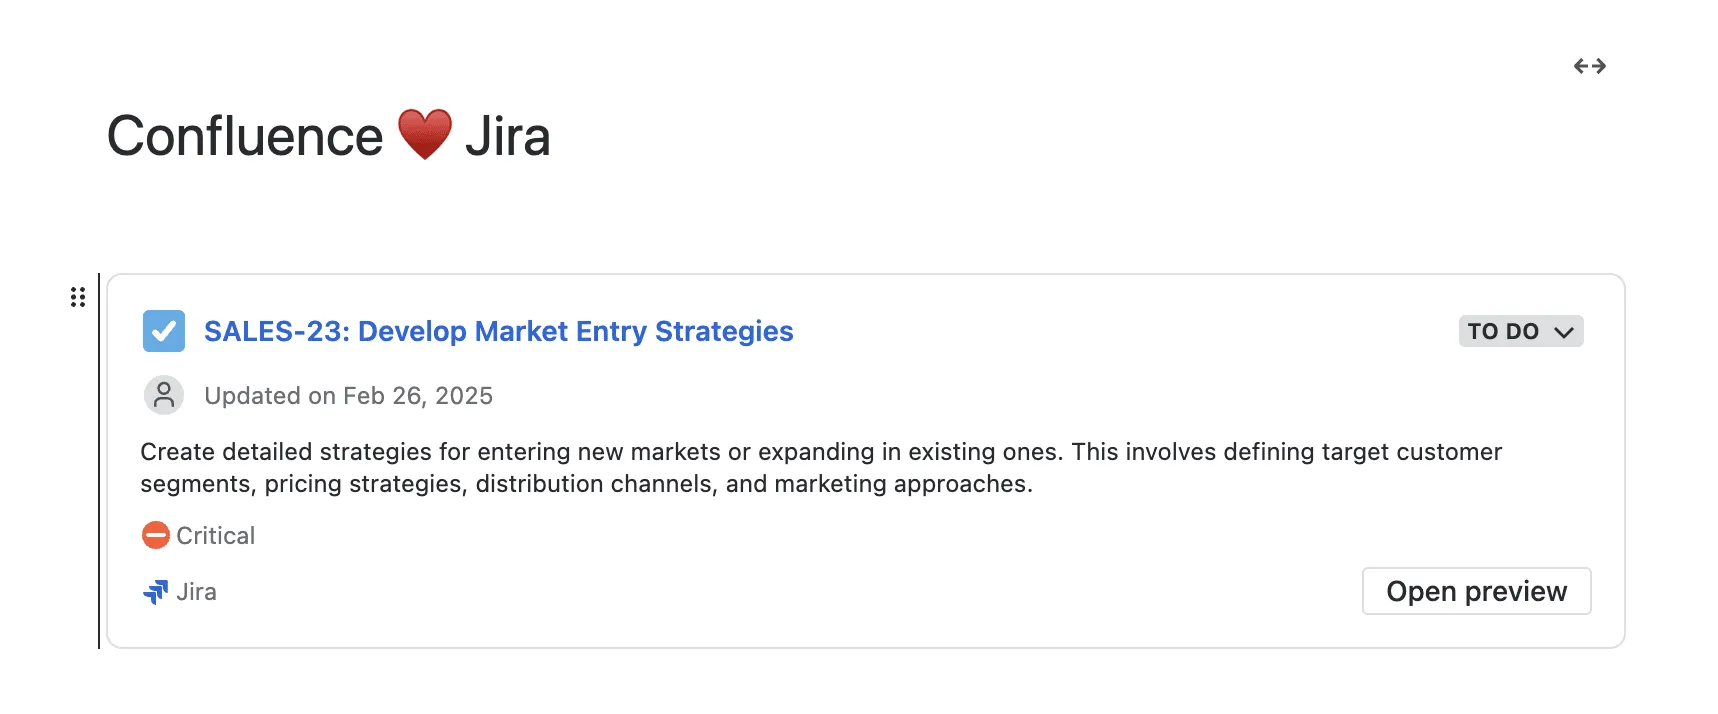
✅ Pro: No more “Is this ticket done?” chats.
❌ Con: Searching for a specific Issue can be tricky
Embed a list or table of Jira issues
Use the Jira Issue/Filter macro to display a list of issues:
- Access it via the “+” menu or by typing /jira.
- Select a saved filter or manually search for multiple issues.
- Or choose “Advanced” and enter a JQL query.
JQL Example:
This query generates a live-updating table based on dynamic conditions—ideal for reports, dashboards, or tracking personal work.
Display Options Include:
- Columns: Pick which fields to display (e.g., status, priority, assignee).
- Sorting: Sort by due date, priority, etc.
- Filters: Apply conditional logic to tailor the view.
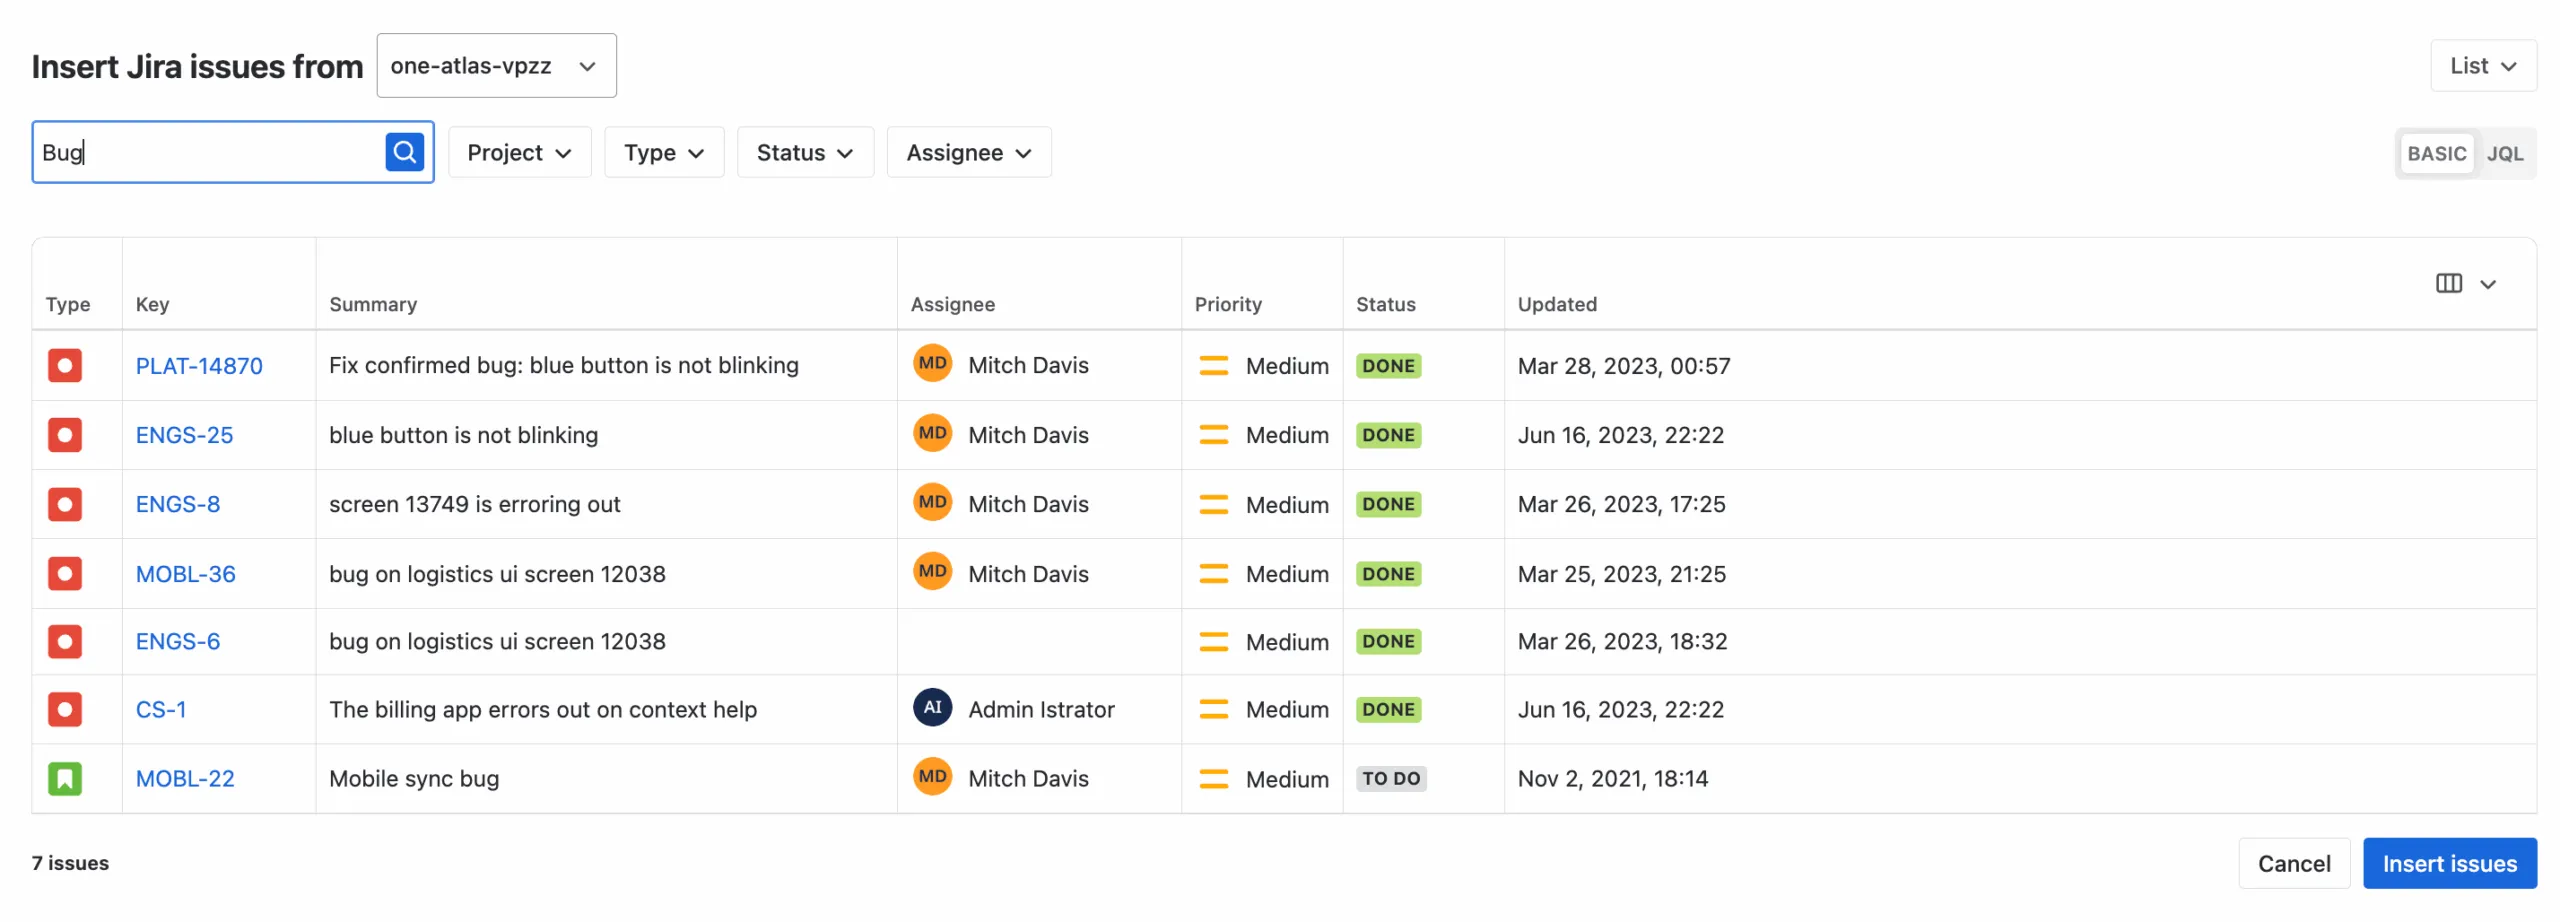
✅ Pro: Excel-like customization. Auto-refreshes with real-time Jira data. ❌ Con: More advanced filters may require knowledge of JQL.
Display a Jira timeline (roadmap view)
The Jira Timeline macro lets you embed a visual project timeline:
- Type /jira timeline or use the “+” menu → Jira Timeline.
- Paste your project or board URL.
- Select display options (day, week, month, quarter).
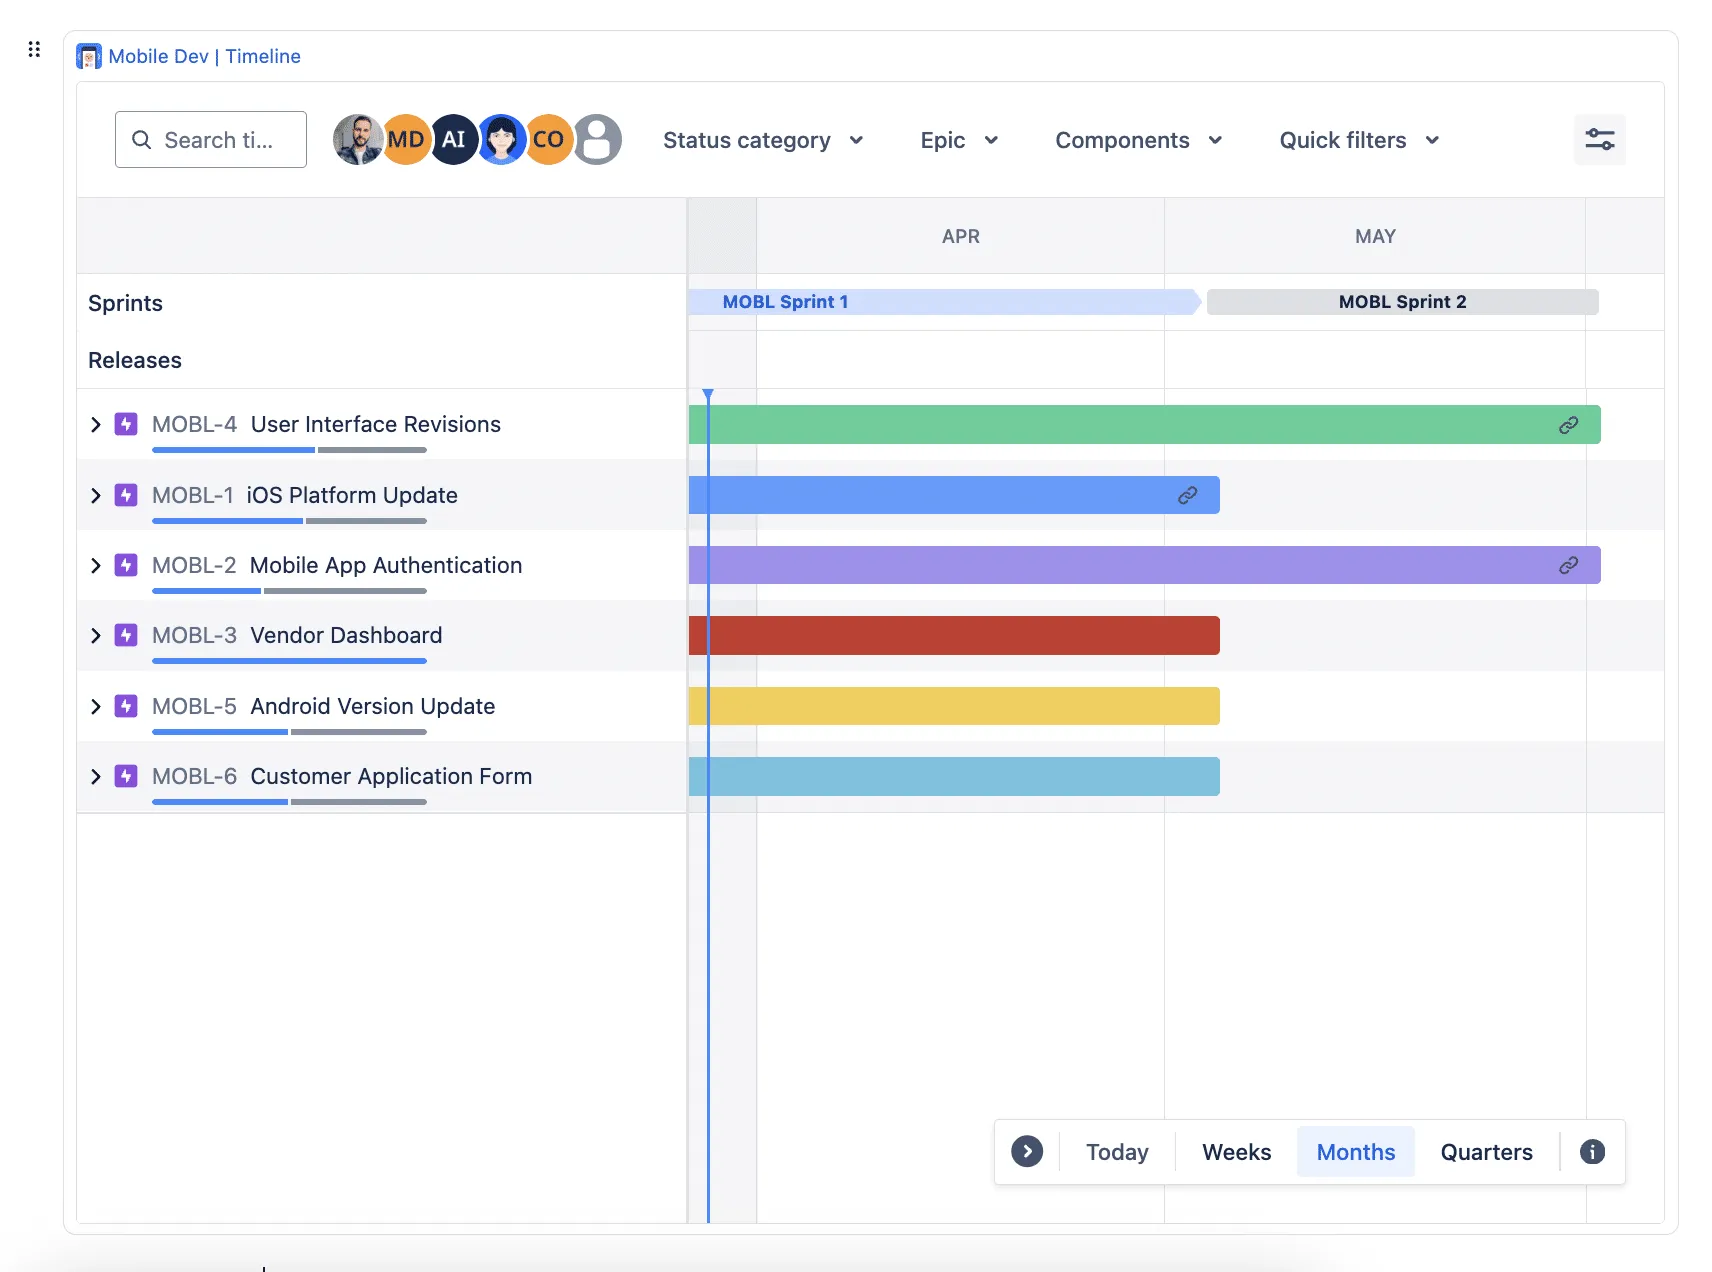
Customize views using the filter icon (top right), where you can adjust:
- Time ranges
- Epic-level visibility
- Date markers for launch or milestone planning
✅ Pro: Great for tracking milestones and progress visually. ❌ Con: Requires access to the Jira instance; For advanced planning features like cross-project views or capacity planning, you’ll need Jira Premium or Enterprise.
Display Jira charts
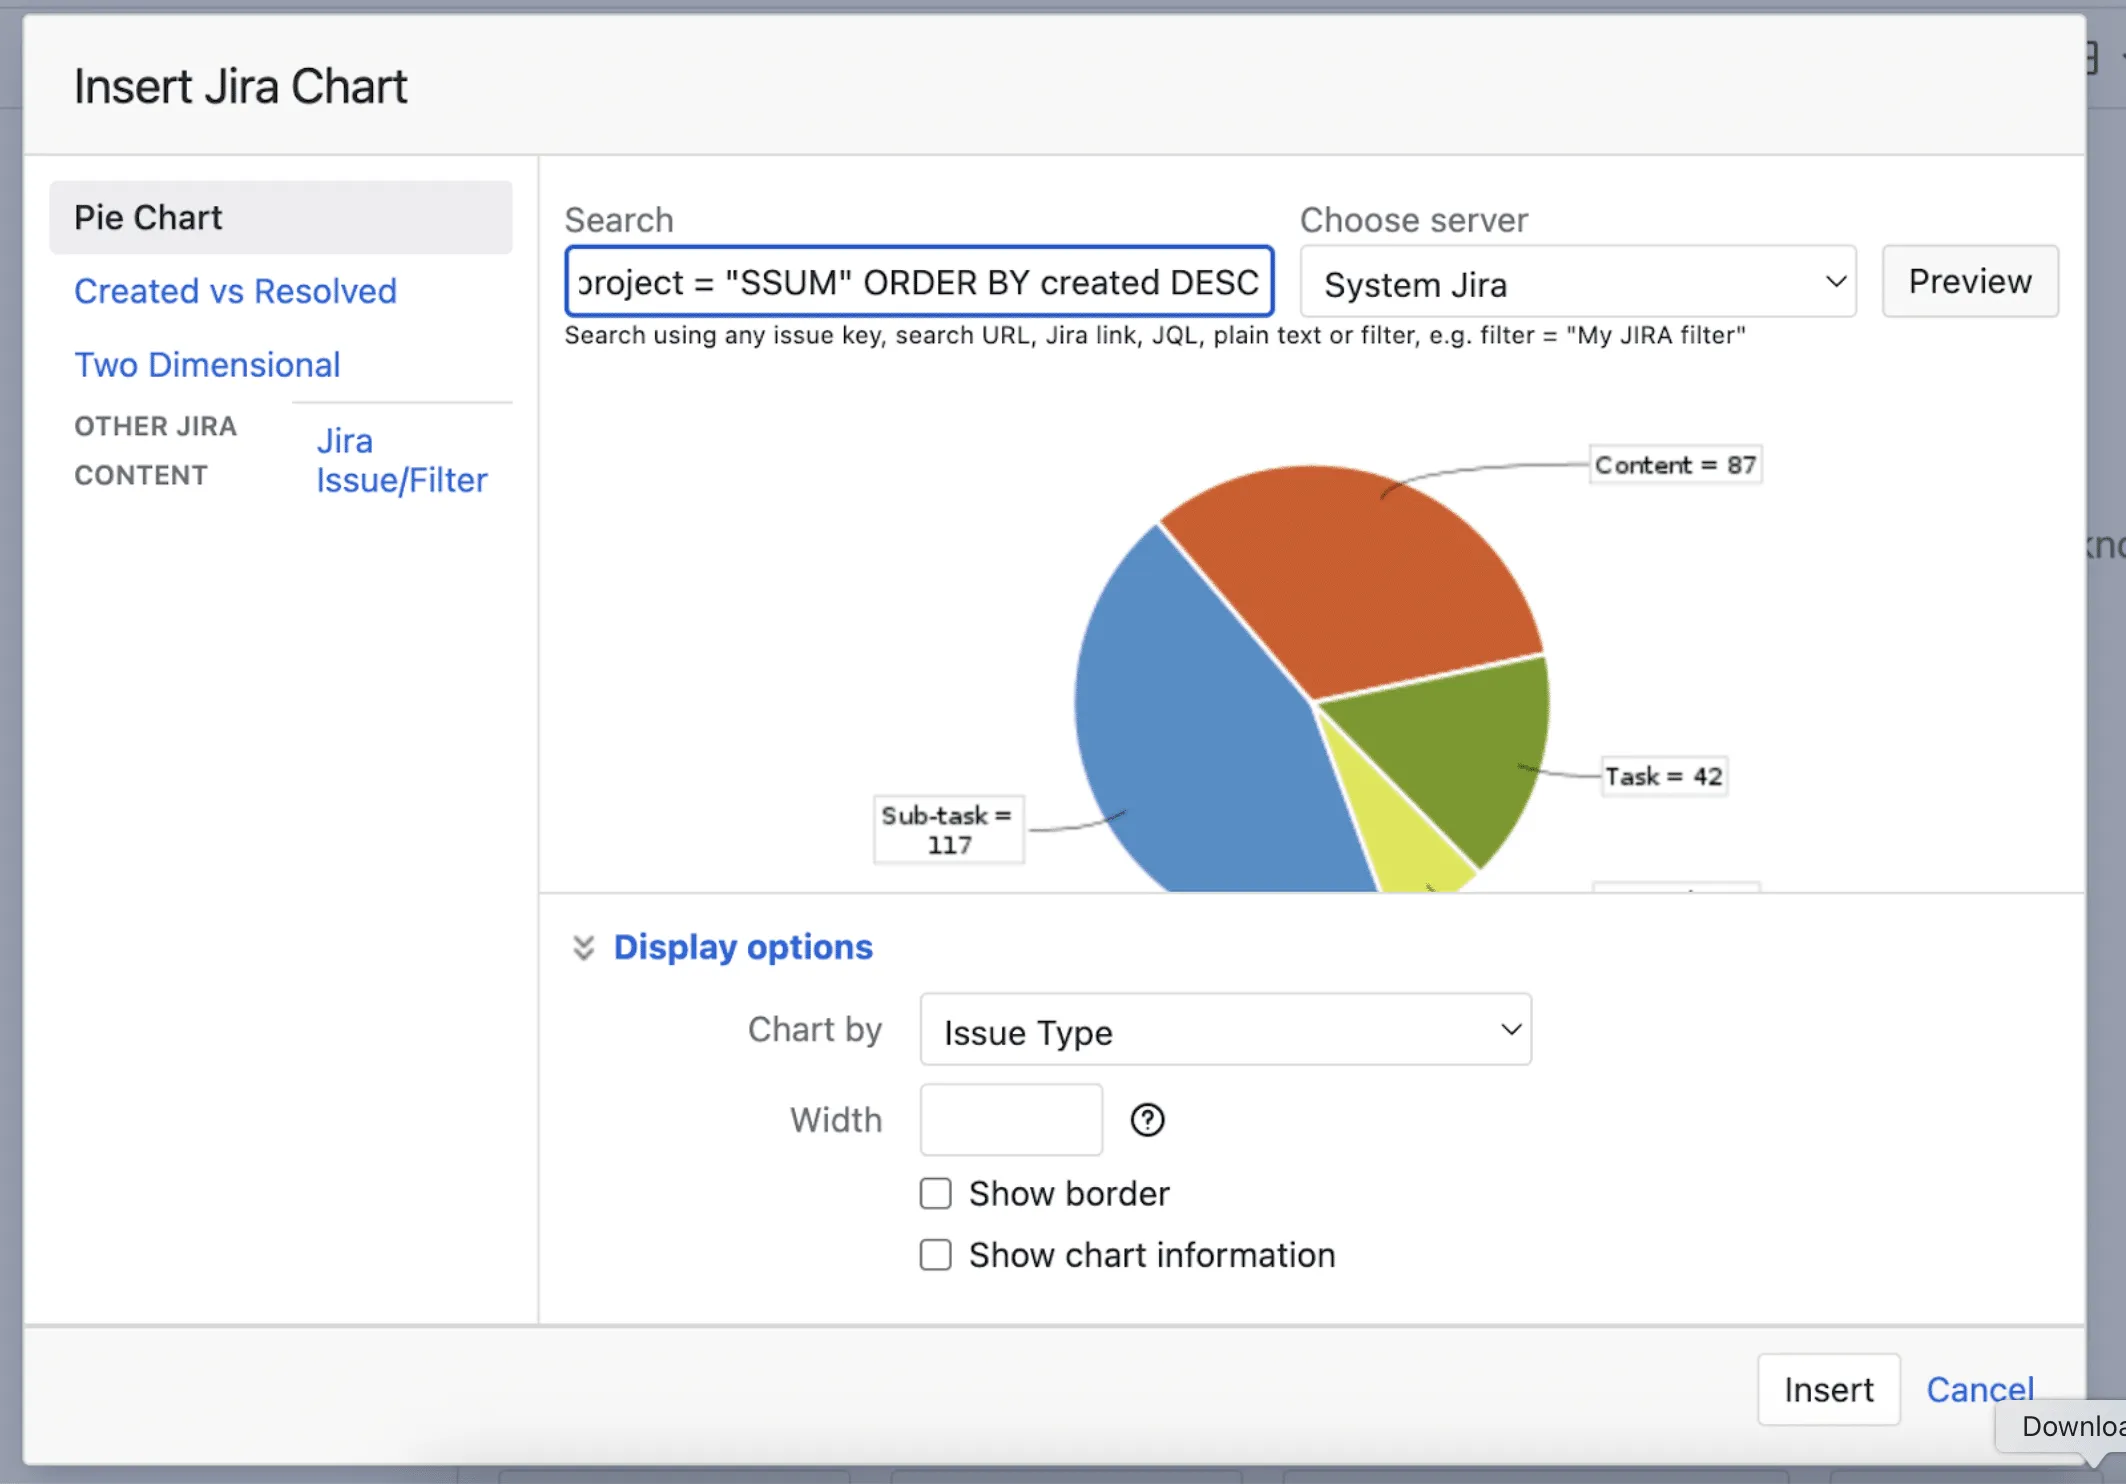
Use the Jira Chart macro to create visual representations of issue data:
- While in the Confluence editor, insert via “+” → Jira Chart.
- Choose chart type: Pie Chart, Created vs Resolved, or 2D Charts and your Jira server.
- Input a JQL query or use a saved filter.
- Configure visual settings in Display Options.
- Click Insert
Available Charts:
- Pie Chart – Segment by assignee, priority, status, etc.
- Created vs Resolved – Track issue flow over time.
- Two-Dimensional – Visualize issues in a grid (e.g., status vs assignee).
✅ Pro: Instantly communicate project health to stakeholders. ❌ Con: Customization options are limited; requires basic JQL skill.
Display a Jira dashboard
You can embed a full Jira dashboard via smart linking:
- Copy your Jira dashboard URL.
- Paste it into Confluence → auto-converts into a rich smart link.
- Optionally use the “Insert Link” tool for labeled hyperlinks.
This lets you showcase a team’s entire status overview, sprint board, or workload in a single glance.
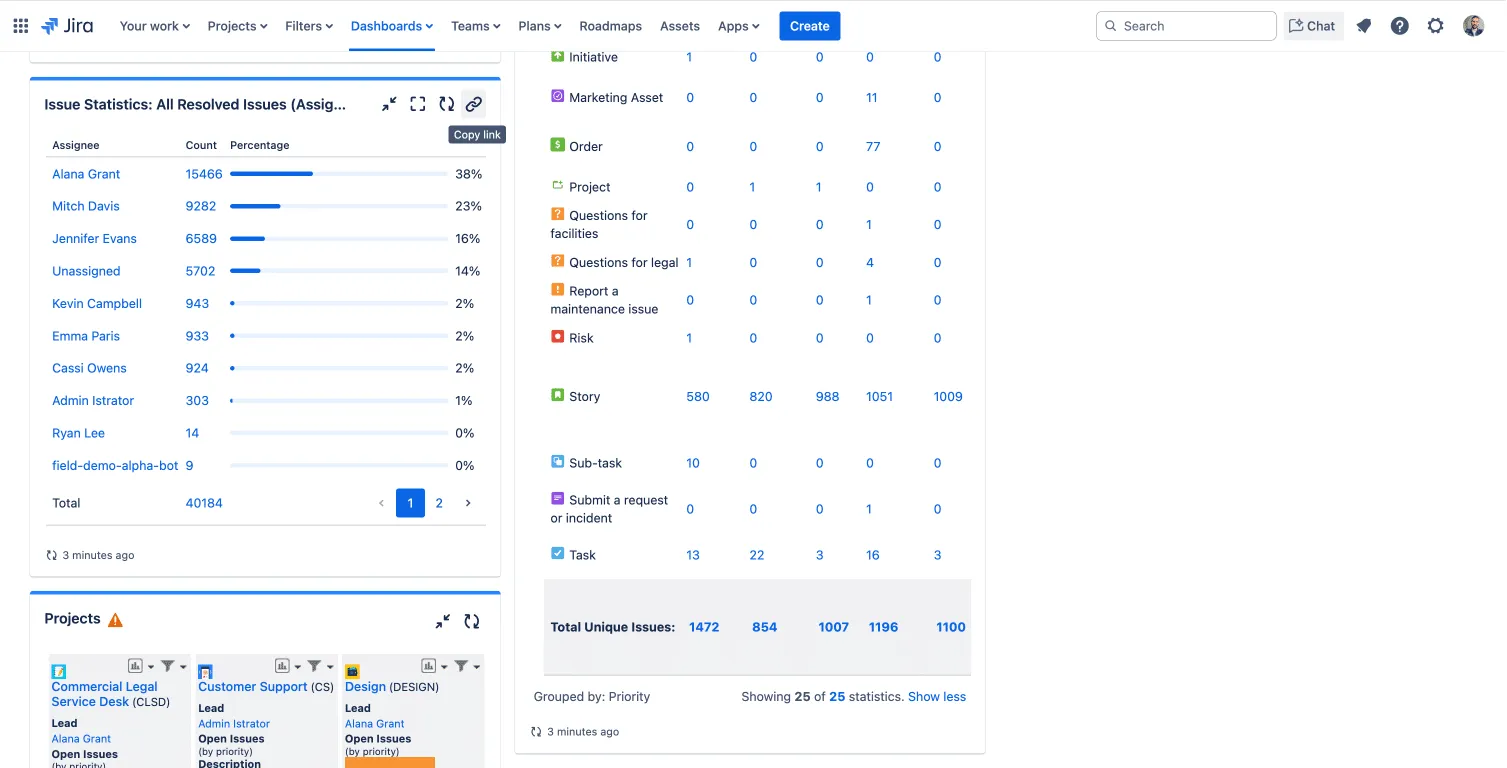
✅ Pro: Centralized view of metrics. ❌ Con: May load slowly; setup can be a time-consuming activity.
Creating Jira issues from Confluence
Integration isn’t just about bringing Jira data into Confluence, it also enables Confluence to drive work in Jira. Here’s how to create Jira issues without ever leaving your documentation workspace.
- Edit mode: While editing a Confluence page, type /jira and select “Create Jira issue” to open a dialog with access to all project fields, including custom fields, attachments, and advanced settings.
- Live mode: On any published page, highlight text and click “+ Jira issue” to create tickets with pre-filled summaries and descriptions. Teams using Confluence Premium+ or Jira Premium+ can also use Atlassian Intelligence to automatically generate content for the ticket or identify multiple actionable items for bulk creation.
- Table Conversion: Select any table on a Confluence page to create multiple Jira work items. You’ll have to decide on column mappings to populate the different Jira fields—useful for converting requirement lists, bug reports, or action item tables into tracked work items.
These native approaches work well for quick, flexible issue creation.
Automated issue creation via action items
Thanks to Confluence Automation, action items can be automatically converted into Jira issues without switching tools.
Here’s how:
- In Confluence automation, create a rule with the trigger “Task created.”
- Set the destination project and issue type in Jira.
- Once activated, any new action item will result in a linked Jira issue—keeping your docs and tracking perfectly aligned.
✅ Pro: No manual entry—issues appear as you write tasks. ❌ Con: Requires space admin setup and might be error-prone for bulk actions.
Create Jira issue from Confluence via Rovo AI
You can now easily create Jira issues directly from Confluence with the help of Rovo AI!
To get started, simply highlight the relevant text in your Confluence page and click ‘Create Jira Issue.’ The ticket will automatically pre-fill with the selected snippet, whether it’s meeting notes, a description, or a summary. Optionally, you can enable AI assistance to generate a concise summary and description for the issue.
If you are working with a table in Confluence, format the header with columns labeled Summary and Description. Then, click ‘Create Jira Issues.’ Rovo AI will instantly generate Jira tickets for each row in the table, pre-filling them with the corresponding content. It’s that easy!
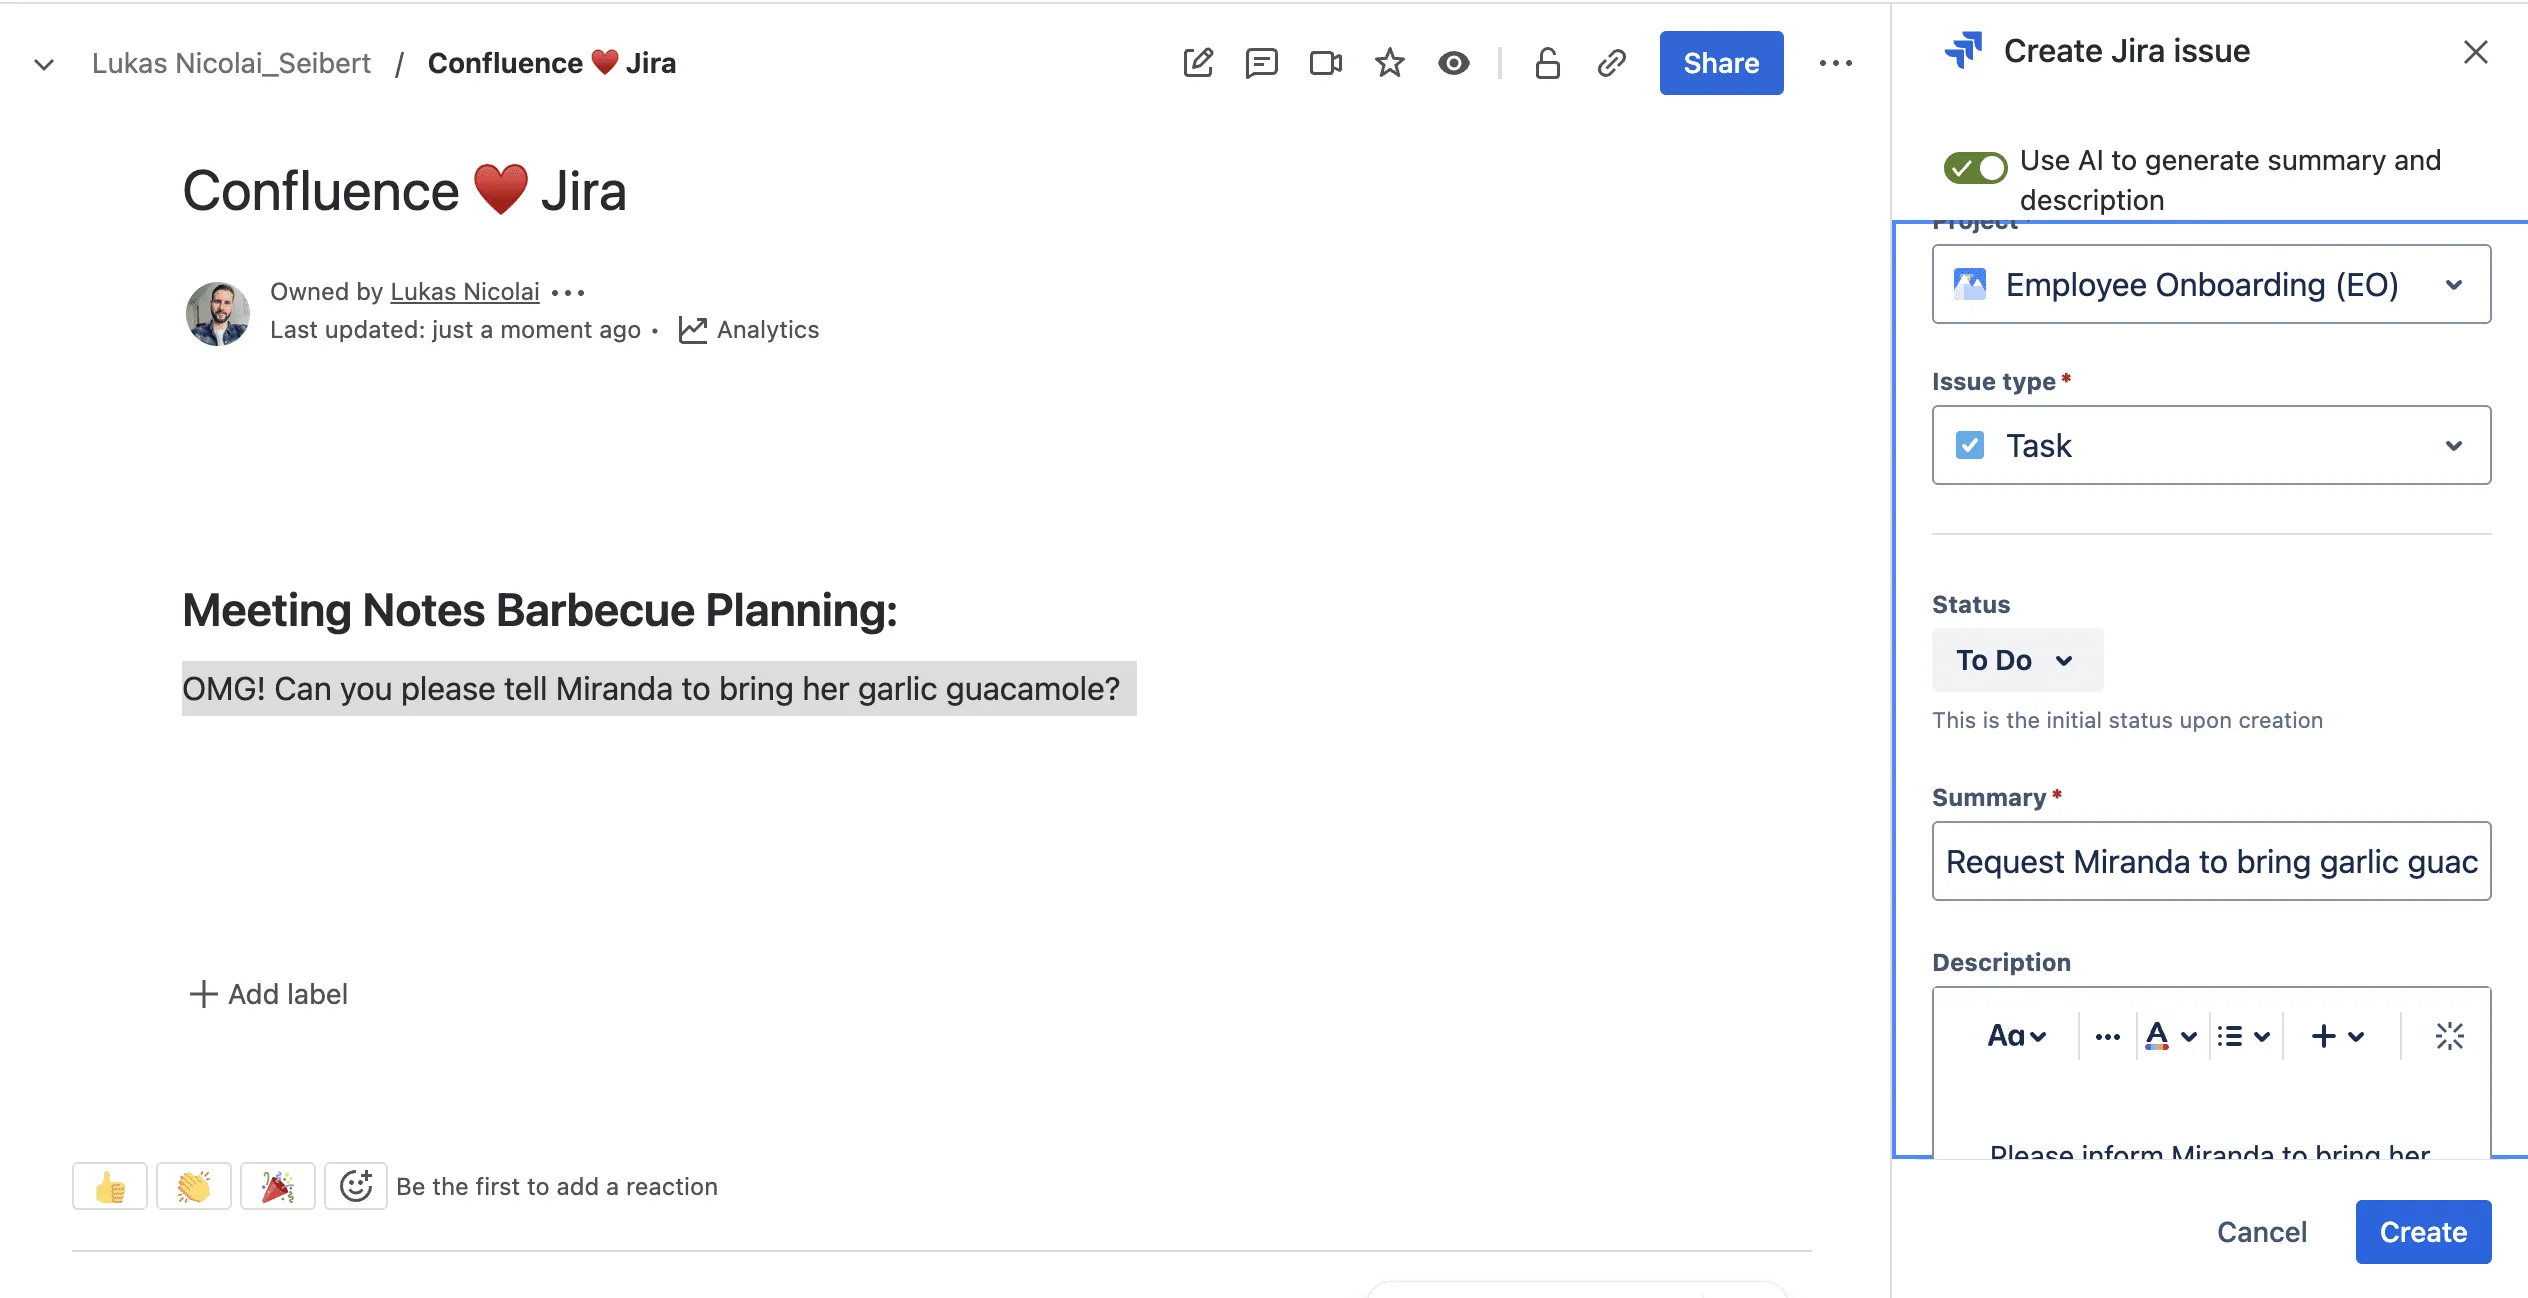 ✅ Pro: No need for switching apps.
❌ Con: Field mappings may need tweaking. AI is still error prone, especially for creating multiple issues.
Create standardized Jira issues with Viable Issues
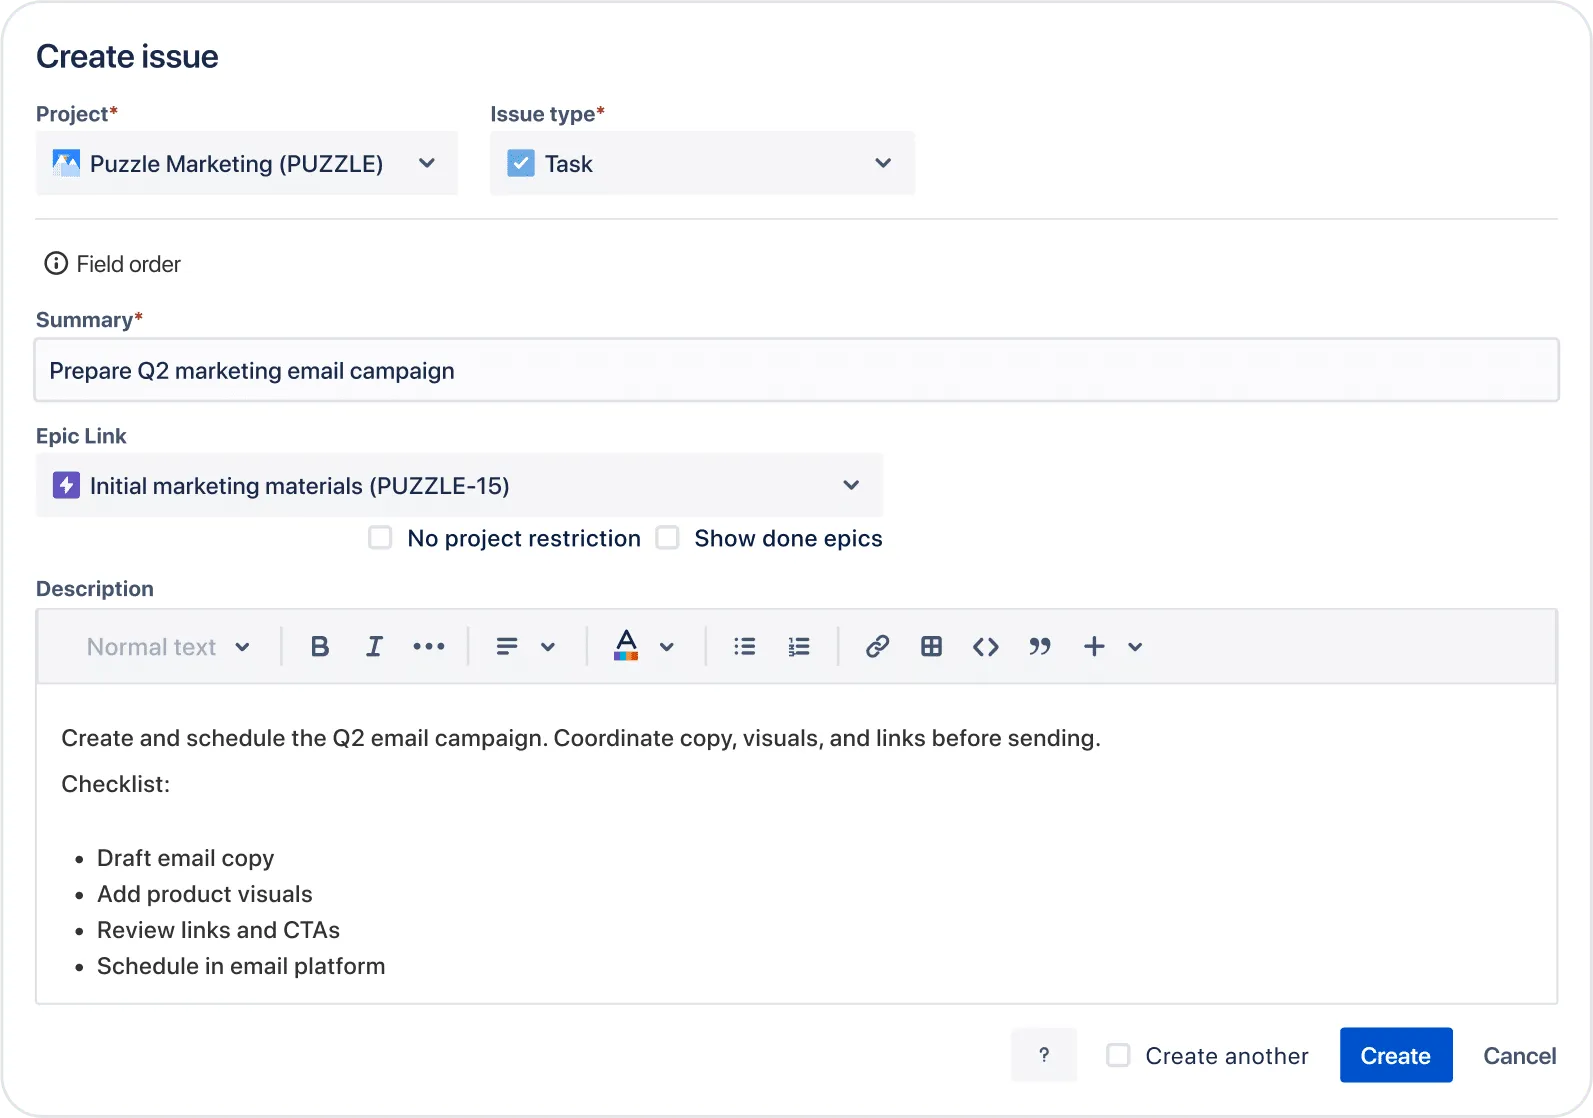
Teams requiring consistent field population and standardized ticket routing may benefit from complementary tools like Viable Issues, which allows you to place predefined “Create Issue” buttons with preset fields (project, issue type, labels) anywhere on pages. This ensures tickets automatically route to the correct projects and starts off with the right information. It also provides easy, page-level reporting to track all issues created from a specific Confluence page.
Page creation from Jira
What about the other way around, creating pages from a Jira work item? Again there are multiple ways to do it.
Manual page creation from Jira
Need to document directly from a Jira issue? Atlassian makes this easy:
- Inside a Jira issue, click Create Confluence Page or Whiteboard.
- A blank Confluence page opens without leaving Jira.
- Start writing meeting notes, release summaries, or feature specs—fully linked to the issue context.
✅ Pro: Keeps context intact without switching apps. ❌ Con: Manual step; not scalable for frequent documentation needs.
Using Automation to create pages from Jira
Jira automation can trigger Confluence page creation automatically based on work activity. For example, you can set up a rule that creates a Confluence page when a task is moved to a specific status, or when a specific label or component is added.
Here’s how:
- Go to Project Settings → Automation in Jira.
- Choose a trigger (e.g., “Issue Created”).
- Set optional conditions (e.g., issue type = “Bug”).
- Select the Create Confluence page action
- Use smart values like
{{issue.key}}or{{issue.summary}}to populate the page title dynamically. You can also select the parent page where the page will be created, as well as use a template. If you want to embed data from the Jira issue onto the page, you’ll need to use smart values and are limited to the basic formatting options available within the Automation action configuration.
This kind of automation ensures documentation is created consistently and on time—without requiring manual effort from your team.
Using AutoPage for automated page creation
For more advanced documentation needs, consider using AutoPage, an app that creates Confluence pages populated with real-time Jira issue data using customizable templates.
Set up your template
Create a Confluence page as a template. Within this template, insert AutoPage macros to pull in Jira fields:
- Inline Macro for short, text-only fields like “Reporter”.
- Rich Text Macro for multi-line fields like “Description” or comments.
- Card Macro for a visual block of issue metadata.
Configure sync mode
- Live Sync: The page pulls fresh Jira data every time it loads.
- On Page Update: The page content is saved as-is when created—ideal for performance or snapshot documentation.
Create the AutoPage rule
In Jira, go to the AutoPage settings under your project. Set up a rule by defining:
- Trigger (e.g., new issue or webhook)
- Condition (e.g., issue type = Bug)
- Action (generate page using your template)
AutoPage makes it easy to scale documentation across teams without repetitive setup.
Pro tips for a seamless workflow
To get even more out of your integration, take advantage of a side-by-side view. When you display Jira issue data in Confluence with Autopage, Confluence is automatically mentioned in the Jira ticket, creating a visible reference. Similarly, use the Confluence Page Gadget in Jira to view relevant documentation right from the issue view.
Once you’re done with the configuration, Confluence pages will be created automatically from Jira.
Want to scale your documentation without scaling your manual effort? Download AutoPage on Atlassian Marketplace to automate Confluence content from Jira issues and streamline your team’s knowledge sharing.
Troubleshooting common issues when integrating Confluence and Jira
If something isn’t working, here are common pitfalls to check:
- Cloud Applink Confusion: Admins manually create an application link between same-org Jira and Confluence, which breaks the automatic system link; cross-domain setups (abc.atlassian.net vs xyz.atlassian.net) also can’t do full linking. Fix: delete the manual link and let the system one work, or consolidate onto one domain. (Atlassian KB: Confluence links fail to authenticate)
- Reciprocal Link Missing (DC/Server): “We can’t connect with Confluence because a reciprocal application link is missing.” Fix: confirm both apps can reach each other (curl test, check for URL typos), verify the link exists on both sides, then delete and recreate it. (Atlassian Community: reciprocal application link missing)
- Macro Timeout / Render Failure: The Jira Issues macro times out or throws “Error rendering macro ‘jira’.” Confluence has a 10-second backend wait for Jira plus a hardcoded 1-minute front-end limit; complex JQL trips the first, many macros on one page trip the second. Fix: simplify/scope the JQL, fewer macros per page; on DC, raise the backend timeout and thread-pool/queue size. (Atlassian KB: Jira macros don’t work or timeout in Confluence)
- Custom Fields Blank in Macro: Standard fields display but a custom field renders empty despite having a value. On DC this tied to a known bug fixed in Confluence 7.4.3 (workarounds: disable/re-enable the Confluence Jira macro app, restart, or downgrade the plugin); on Cloud it’s an unexplained regression that often resolves itself after a day or two. Gotcha: a very recently created custom field may not be available yet. (Atlassian Community: Jira custom fields not displayed in macro)
- Back-Links Not Syncing: The reciprocal “Mentioned in” / “Confluence content” panel on the Jira issue fails to populate. A known limitation: putting more than one issue in a single macro doesn’t create the back-link. Fix: add the page link in the Jira issue description and save — the panel populates and stays even if you then delete the link; or edit the page (remove the key, publish, re-add, publish) or clone the page. (Atlassian Community: Confluence content not showing in Jira issue)
- Viewer Can’t See Macro Data: JSM portal customers / unlicensed users get “Data cannot be retrieved” on a Jira macro. Cause: the JQL permission is restricted to logged-in Jira users; the only real fix is giving them Jira accounts with Browse Project permission (needs a license). Open feature requests exist for view-only access. (Atlassian KB: macro access requirements for JSM portal customers)
- OAuth Token Rejected: The link shows “connected” but auth still fails (consumer_key_rejected, repeated “Log in & Approve”). Cause: the link is up but the OAuth token is invalidated; diagnose by tailing the log while reproducing and testing with a fresh user in both apps. On Cloud, deleting a stray manual link usually fixes it. (Atlassian Community: can’t connect to Confluence because the application link)
- No JQL for Confluence-Linked Issues: There’s no native JQL field for “has a linked Confluence page”; the workaround is the issuesWithRemoteLinksByGlobalId() function using the page’s appId and pageId, and it only works for proper “Confluence content” links, not plain web links. Feature request JRACLOUD-81075 is open. (Atlassian KB: find issues linked to a Confluence page using JQL)
- Single-Issue Count Quirk: When a JQL returns exactly one issue, the macro shows the full issue detail instead of “1 issue.” Workaround: switch the macro to an inline/URL link and edit the display text, or temporarily add a second issue so it renders as a count. (Atlassian Community: macro doesn’t display the count of issues)
Bottom line
Integrating Jira and Confluence brings your team’s planning, execution, and documentation into one seamless ecosystem. From live issue tracking and visual reporting to automated page creation and scalable knowledge sharing, this integration reduces friction and increases productivity.
If you’re ready to unlock the full power of your Atlassian tools, reach out to our experts at Seibert to help you implement a tailored, scalable Jira-Confluence setup.